Friday, September 27, 2013
The Free Motion Quilting Project: 60. Secure Appliques to a Quilt Background
The Free Motion Quilting Project: 60. Secure Appliques to a Quilt Background: So we've turned the edges of our large applique pieces and it's time to connect them together and secure them to the quilt backgroun...

Thursday, September 19, 2013
Tuesday, April 16, 2013
!Insights From SewCalGal: A Good Day Is A Day Spent Quilting
!Insights From SewCalGal: A Good Day Is A Day Spent Quilting:
I hope you have wonderful day and find time to enjoy and create. While SewCalGal is copyright protected, if you like the clipart this ...

I hope you have wonderful day and find time to enjoy and create. While SewCalGal is copyright protected, if you like the clipart this ...

Thursday, January 3, 2013
New Year 2013
I am glad everyone made it through to another year of quilting, fabric hunting or whatever your addiction may be! I have several but quilting is by far the most addicting! I do love it since it does let me get my creative juices flowing! I have several resolutions, hoping I can make myself proud by the end of the year...
1. Be the best example I can be to my husband, kids, grand kids and for those around me!
2. Finish the grandmother quilt...
3. Don't be afraid to try new techniques...
4. Get a new sewing machine...
5. Enter a quilt into a show this year....
6. Meet deadlines....
7. Don't forget to take care of myself too...
8. Have fun!
For now I think that is enough! I may add to it, take some away or adjust wherever I need to. The most important thing is to write things down to get a clearer vision and don't be afraid! Try those new free motion designs. Join a monthly quilting challenge! Play all day at least once every other week! Or every week! Focus on what makes you happy or will make you happy! More family time? More me time? More spiritual time? Do what you can do, want to do and give yourself a break! That's what I am going to do!
This is my dad, Evans H. Craig! He was called Pete! I still call him Daddy! He past away in Jan. 2010. He has always believed in me and made me want to do better! This year, 2013, I am going to make him proud! I miss him... I love him.....
.jpg)
AND... these are 3 of my Grand kids that will be living with us so I have lots of parenting to look forward to! I am so happy to have them with me! Nita, Brianna and Rudy!

And my youngest grand son Damian, of course! His daddy, my son Willy, brings him over to visit! So I have so much to look forward to in 2013!


1. Be the best example I can be to my husband, kids, grand kids and for those around me!
2. Finish the grandmother quilt...
3. Don't be afraid to try new techniques...
4. Get a new sewing machine...
5. Enter a quilt into a show this year....
6. Meet deadlines....
7. Don't forget to take care of myself too...
8. Have fun!
For now I think that is enough! I may add to it, take some away or adjust wherever I need to. The most important thing is to write things down to get a clearer vision and don't be afraid! Try those new free motion designs. Join a monthly quilting challenge! Play all day at least once every other week! Or every week! Focus on what makes you happy or will make you happy! More family time? More me time? More spiritual time? Do what you can do, want to do and give yourself a break! That's what I am going to do!
This is my dad, Evans H. Craig! He was called Pete! I still call him Daddy! He past away in Jan. 2010. He has always believed in me and made me want to do better! This year, 2013, I am going to make him proud! I miss him... I love him.....
.jpg)
AND... these are 3 of my Grand kids that will be living with us so I have lots of parenting to look forward to! I am so happy to have them with me! Nita, Brianna and Rudy!


Thursday, December 27, 2012
Damian Completed!
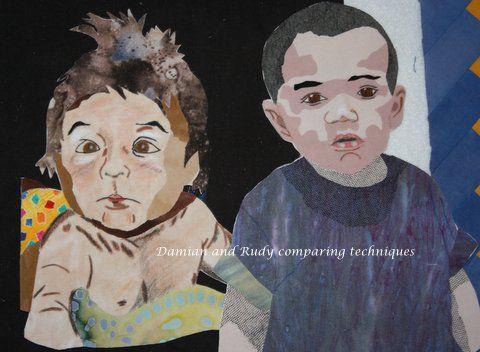
I have been working on the grandmother quilt. This is the last face added to it after my youngest grandson came into the picture in April! This is the pattern. I then traced it onto freezer paper and used that to cut up. It's pretty easy using this method because you can iron the freezer paper right onto your fabric. Just cut it out adding the 1/4" for overlapping where necessary!

This is after I had the base fabric for his face. Then I added the darker areas for shadows in varying degrees. I use my hand dyed fabric for the skin. Only the blanket, shorts and hair are commercial fabric. In all the other faces I used only hand dyed fabric. See the freezer paper face to the left?

I also did the face in paint to see what it would look like, however, it did not match the other faces done in fabric. But I wanted to show it to you... It was fun! I have since added hair!

Here is Damian's face completed next to Rudy, who is done in fabric only. So it works out well, I think! I am very happy with Damian's face. I don't think you can tell that Damian is colored a little bit with colored pencils! I heat set the color!


This is after I had the base fabric for his face. Then I added the darker areas for shadows in varying degrees. I use my hand dyed fabric for the skin. Only the blanket, shorts and hair are commercial fabric. In all the other faces I used only hand dyed fabric. See the freezer paper face to the left?

I also did the face in paint to see what it would look like, however, it did not match the other faces done in fabric. But I wanted to show it to you... It was fun! I have since added hair!

Here is Damian's face completed next to Rudy, who is done in fabric only. So it works out well, I think! I am very happy with Damian's face. I don't think you can tell that Damian is colored a little bit with colored pencils! I heat set the color!
Friday, December 7, 2012
I have been searching for a new machine to upgrade the techniques I am using in my art quilts! I was looking at a Janome 6300 and went to test drive it Thursday, Nov 8th after my guild meeting! I did go and I test drove it and it was wonderful! BUT....... I happened to look over my shoulder and saw the Horizon! There were two kinds! The 7700, which they were not carrying anymore, and the 12,000 which is the new Horizon replacing the 7700! I didn't even bother with the 12,00 because it's price was $3000! But the Horizon 7700 was his last one and it was a floor model. I should have walked by it but I did not! I sat down and tested it! All the functions were really the same, straight stitching, free motion and zigzag! But then I wanted to do free motion zigzag which my Viking 715 does not do well at all. The dealer changed the foot for me to the clear round one, set the machine up for me and said "go for it!" I followed the meandered pattern someone else had done with the zigzag to see if it could take the turns and tight spaces around what I do with hair, faces, around eyes and noses! IT WAS MAGNIFICENT! I held my breath and whispered.... I'll take it!


Wednesday, December 5, 2012

Saturday, November 17, 2012
Thread Painting....
I learned something new today and Lola Jenkins, http://lolasdesignerquilts.com/About_Us.html, helped me solve my puckering problem! I actually have never had a problem, however, I think it was because I did the thread painting before it was quilted whereas I generally do it through all 3 layers. I added a heavy weight stabilizer and that solved my problem! Here are the steps I have taken so far....
Step 1.... This is the original panel and I have colored it with Inktense Pencils by Derwent.


So my advice is... first, do a practice piece and see if the stabilizer is going to work on the amount of thread painting your doing. Second, use lots of thread and have fun with it! Third.... there are no mistakes only learning opportunities! Have fun!!!
Step 1.... This is the original panel and I have colored it with Inktense Pencils by Derwent.

Step 2... I started to do the thread painting but it started to pucker even though I had stabilizer on the back. It wasn't heavy enough!

I spoke with Lola Jenkins on FaceBook, quilter extraordinaire, & she said she uses heavy weight stabilizer. I guess Ricky Tim's Stable Stuff is not heavy enough for this particular project. I have always used Stable Stuff and it did well on my faces in my quilts!
Step 3... I added a layer of heavy weight stabilizer! And it worked!

No more puckering at all! I am not finished but I wanted to share my progress! Here is a close-up of what I have done so far! It is intoxicatingly fun!

So my advice is... first, do a practice piece and see if the stabilizer is going to work on the amount of thread painting your doing. Second, use lots of thread and have fun with it! Third.... there are no mistakes only learning opportunities! Have fun!!!
Tuesday, November 13, 2012
Show and Tell
I decided it is time for some show and tell.... Some of these I still have and some are in private collections...


And my underwater scene quilt fused, painted, thread painted, pre-quilted and quilted wall hanging! Yet to be named! Maybe you can help.....

My first art quilt... Fancy Dancer...


My Reservation inspired quilt... Go Past the Rocks & Turn at the Bush... I used Rose Hughes techniques on this wall hanging. She liked it so much she put it in her book "Dream Landscapes - artful quilts with fast-piece applique" on page 82! http://www.rosehughes.com/Books.htm

I did some thread painting to make the bushes along the bottom in orange and blue and used dryer lint to embellish it. I also embellished the rocks using yarns and ribbons! I used some commercial fabric and my own hand dyed silk for the sunset!
This is a wall hanging in progress called Window Rock....
It will be heavily thread painted using Hollis Chatelaines machine techniques. I have lots of bold threads to use on this one!

And my underwater scene quilt fused, painted, thread painted, pre-quilted and quilted wall hanging! Yet to be named! Maybe you can help.....

And you all have seen the latest quilt I am working on which I talked about in my previous posts! I also have several small wall hangings I am finishing up for class samples! Thanks for listening!
Monday, October 22, 2012
Who knew I had such a big stash!
Hand dyed pile on the far right.... There's yellows, 2 piles blues, purples, (back row) reds, browns, oranges, & black... The greens aren't even in this group!


My stash!
I decided to divide my fabric stash into colors and was very surprised to see how much fabric I have! This is just my greens...

Sunday, October 21, 2012
A different arrangement for the faces! Damian too!
This is a different arrangemen

I never noticed it before but all the boys shirts are darker colors! Maybe I should add some color to Elamar's shirt in the lower left hand corner! I still have to set the paint on the dreamcatcher but will do that in 5 days after I let it cure. I'll add more color for dimension in the dreamcatcher with thread.

I never noticed it before but all the boys shirts are darker colors! Maybe I should add some color to Elamar's shirt in the lower left hand corner! I still have to set the paint on the dreamcatcher but will do that in 5 days after I let it cure. I'll add more color for dimension in the dreamcatcher with thread.
Wednesday, October 17, 2012
Re-designing the Grandmother Quilt!
Well.... I have taken the advice of my followers and re-arranged the faces around the dreamcatcher and have finally come to the conclusion that I am going to have to add my new Grandson to the quilt! He's 6 months old which was why he wasn't on it to begin with! I finished the other faces almost 2 years ago! But here is what I have decided to use! This is the pattern for it.....
This is Damian, my grandson!
 I will have to keep the size of the finished face in mind, as I didn't do that with the others! So he will fit right in, in an appropriate size!
This is Damian, my grandson!

Saturday, October 13, 2012
My Studio!
I know this is really just a corner of my living room but to me it is my quilting studio! I am so proud of it! LOL...

I have added a shoe tree that I have adapted to hold all my quilting supplies and tools on that blank wall to the left! My design wall is in back of my machine with my "Fancy Dancer" wall hanging. I am happy to say I got my extension table for $30 at an estate auction. Brand new!

I have added a shoe tree that I have adapted to hold all my quilting supplies and tools on that blank wall to the left! My design wall is in back of my machine with my "Fancy Dancer" wall hanging. I am happy to say I got my extension table for $30 at an estate auction. Brand new!
My new blog! And a new quilt!
I am starting a new blog to share my journey in fiber fun!
First up.... A quilt I have had on the back burner for 2 years! I'm painting a dreamcatcher on a quilt that will have 7 faces around the dreamcatcher. The base of the quilt is a pattern of a rug my grandmother wove before her passing in 1975. I dyed the fabric and made the base so the dreamcatcher and faces are on her rug design. My Grandmother will be in the center w/ my kids and 3 grandkids around the outer edges of the catcher. My question is this.... Does the arrangement have balance? I have moved around the people and want some input as to what your opinion is!
#1 - Balanced? or....#2? I am still painting the dreamcatcher. It's taped off so the paint doesn't run.....

#2 - I have rearranged the two kids so that all the boys are on the right... does this look better than the top arrangement?

Here is a close up of the color of the dreamcatcher. I used shiva paintsticks and still need to add thread painting to get the desired effect I want.


#2 - I have rearranged the two kids so that all the boys are on the right... does this look better than the top arrangement?

Here is a close up of the color of the dreamcatcher. I used shiva paintsticks and still need to add thread painting to get the desired effect I want.


Subscribe to:
Posts (Atom)